I'm pretty sure either the machine is jinxed, or I am.
Was doing a quick adjustment and fried the entire row of switches on the right side of the playfield.
Joy to the world.
The worst part is - I've done this two times before!
"I better turn of the power this time!", and so I did. Did a quick fix and turned the power back on, realized I needed to do another quick fix and BOOM. Short circuit.
I guess I should be thankful the switchboard took the hit and not the CPU, myself or anything else that's hard or expensive to repair! Knowing what I know now I should have made the IC's buffer/overload protected or easily replaced by using sockets. Again, next time.
When doing a quick damage control I noticed that one of the solenoid cables had come loose, so I figure I'll do a full go-through on the machine in a couple of days.
Sunday, June 30, 2013
Friday, June 28, 2013
Shine a little light...
Had a little quality time with the machine again last night so I was able to finish up half the lights.
The process of wiring the harness is rather slow and to give you some insight in the process, here goes:
 |
| 1) Starting the process. |
I first start by going from the top-most (i.e closest to the player) hardware that needs wiring, and then roughly aligning the cable until it reaches the end of the board (i.e top of playfield).
I then fix the ends with cable clamps.
 |
| 2) Measuring and roughly estimating groups. |
Going from the bottom and up, I group hardware into sections to ease the actual routing of cables. In this case I was using flat-cables so I divided the cable in appropriate groups along the way.
Care is taken to not obstruct any hardware or hinder serviceability, while still maintaining slight esthetics.
This process alone took a good hour to complete.
 |
| 3) Cutting to length and fixing. |
Once that's done, I do another sweep and cut the cable groups in correct lengths and strip them, fasten and solder them in place.
There went 1.5-2 hours worth of time...
I also realized I completely missed the upper level lights so I had to route the cables for them as well. Luckily I had cables to spare (both lights and switches) so it was just a minute or two setback.
 |
| 4) Tidying up. |
Once everything is soldered, I sweep over the playfield once more to tidy things up. I believe I used 30-40 zip-ties for the left side alone during this session.
It's also during this I notice if anything needs to be changed to flow better, such as the cables around the servo on the bracket, for instance.
 |
| 5) Admire your hard work. |
Behold!
The left side is now complete, with the exception of the flasher. I have not routed +12V on the playfield yet. It's routed to the playfield, just not around and on it.
The whole process took around 4 hours to complete, which is not bad considering I made the harness design on the fly.
I'll probably design it beforehand 'the next time (tm)'...
Having the hardware completed in the next couple of weeks seems entirely plausible now!
Sunday, June 23, 2013
We all live with a yellow targetbank...yellow targetbank...yello...
Finally fixed the motorized targetbank with a more or less proper link between the sledge and servo, as well as soldering the three target switches. I do expect the link to break at some point since it's plastic - but hopefully I'll have a better solution figured out by then, hehe.
Two servos and around 90 lights to solder before it's time to get programming. Nice!
Two servos and around 90 lights to solder before it's time to get programming. Nice!
Sunday, June 9, 2013
Marathon - The non-Bungie version.
Had a marathon session with the pin yesterday - and got a ton of work done.
Still isn't fully playable, but it's getting there!
The whole upper level is now more or less complete, including the splicer figure and switches, cable routing etc.
It took quite a while to get it right, and unfortunately I didn't come up with a good solution to make it easily serviceable, so at the moment I would have to desolder a couple of wires to remove the upper floor. Not optimal, but I hope it won't be necessary to do full service that often. In case it becomes a nuisance I'll look into creating a better solution.
I've installed a few overhead lights for the back of the playfield, will probably need a few more but I'll start with these. They are regular flashers that I intended to run at a lower voltage to (hopefully) spread light over a large area without being overly bright - or burning out to fast.
All lights on the playfield is now installed, still not soldered thou, and it took me a good 45 minutes to replace and insert all light bulbs. In some places I've used LED's and my thumbs curse the stupid designer who made them shorter than regular bulbs as they are really hard to seat properly.
The EVE-hypo is installed and connected as well. It came a little higher up than originally planned, but the headroom is needed to allow balls to pass under it. I might be able to lower it later on thou.
I finalized the switches for the two VUK's - which were a real pair of troublemakers. There was hardly no room to operate in and the brackets had to be custom made. I ended up bending a piece of plastic and cutting it into shape. Works like a charm! As for their endurance, I'll just have to see. I did try to "break" it manually, but they seem to be holding up to any abuse.
I started work on the flashers as well and at the moment only two gameplay flashers are installed, mid-field red and blue. Took a little fiddling and drilling of new holes etc, but nothing major.
I'm having trouble deciding which position is best for the "evil" little sister, but I'm leaning towards the left side of the vent. The downside with the left side is that the right side is somewhat underpopulated at the moment. Having her on the right side looks pretty good too, but there's too little space for a natural stance, making it look a little crammed in there.
I'll probably let her stand to the left for now.
The "good" little sister has gotten her space at the end of the EVE-hypo, near the left outlane. That space needed a little decoration and this was spot on. The only downside would be the lack of proper lighting at that spot. I'll need to investigate this as soon as the lights are up and running, but worst case scenario is that I'll either cut holes in the playfield plastic for light to shine through or simply point a spotlight at her location.
Still isn't fully playable, but it's getting there!
 |
| 1) A Lady Smith splicer model. Had to undergo massive surgery and lost her hips and legs. The full model was just to large to fit anywhere appropriately. |
It took quite a while to get it right, and unfortunately I didn't come up with a good solution to make it easily serviceable, so at the moment I would have to desolder a couple of wires to remove the upper floor. Not optimal, but I hope it won't be necessary to do full service that often. In case it becomes a nuisance I'll look into creating a better solution.
 |
| 2) Back panel lights. Unsoldered at the moment, unsure if +12V or +5V will be ideal. |
All lights on the playfield is now installed, still not soldered thou, and it took me a good 45 minutes to replace and insert all light bulbs. In some places I've used LED's and my thumbs curse the stupid designer who made them shorter than regular bulbs as they are really hard to seat properly.
The EVE-hypo is installed and connected as well. It came a little higher up than originally planned, but the headroom is needed to allow balls to pass under it. I might be able to lower it later on thou.
I finalized the switches for the two VUK's - which were a real pair of troublemakers. There was hardly no room to operate in and the brackets had to be custom made. I ended up bending a piece of plastic and cutting it into shape. Works like a charm! As for their endurance, I'll just have to see. I did try to "break" it manually, but they seem to be holding up to any abuse.
I started work on the flashers as well and at the moment only two gameplay flashers are installed, mid-field red and blue. Took a little fiddling and drilling of new holes etc, but nothing major.
 |
| 3) Left side. EVE-hypo and blue flasher. The flasher is raised to stand above the elevated ramp that goes next to it. |
 |
| 4) Right side. The red flasher is fixed to the playfield plastic, and must be removed as a whole when servicing. It's possible to separate them entirely as well. |
Mr Bubbles is 99% completed now, only two solder points remain on the motor. Most cables are hidden from view when playing, so it's looking pretty neat. As I wrote previously, I decided not to allow horizontal movement/turning at this state as it would take a little more time than I can afford at the moment. His eyes, arm and motor is of course still there.
 |
| 5) Mr Bubbles - up front and menacing. A big centerpiece and is looking really good in context. |
 |
| 6) Behind Mr B. I shrink-wrapped the cables and routed them along the backside of his leg. Discrete and almost invisible from a players point of view. |
 |
| 7) In context. The playfield plastic around his legs that looks black is translucent and will be lit from the underside with pulsing "waves" of light. That's the plan, at least. |
I'm having trouble deciding which position is best for the "evil" little sister, but I'm leaning towards the left side of the vent. The downside with the left side is that the right side is somewhat underpopulated at the moment. Having her on the right side looks pretty good too, but there's too little space for a natural stance, making it look a little crammed in there.
I'll probably let her stand to the left for now.
 |
| 8) Left position. Looking good, but somewhat blocks the red effect-light for the VUK. |
 |
| 9) Right position. Also pretty nice and brings balance to the playfield. Doesn't look as integrated as the left, thou. |
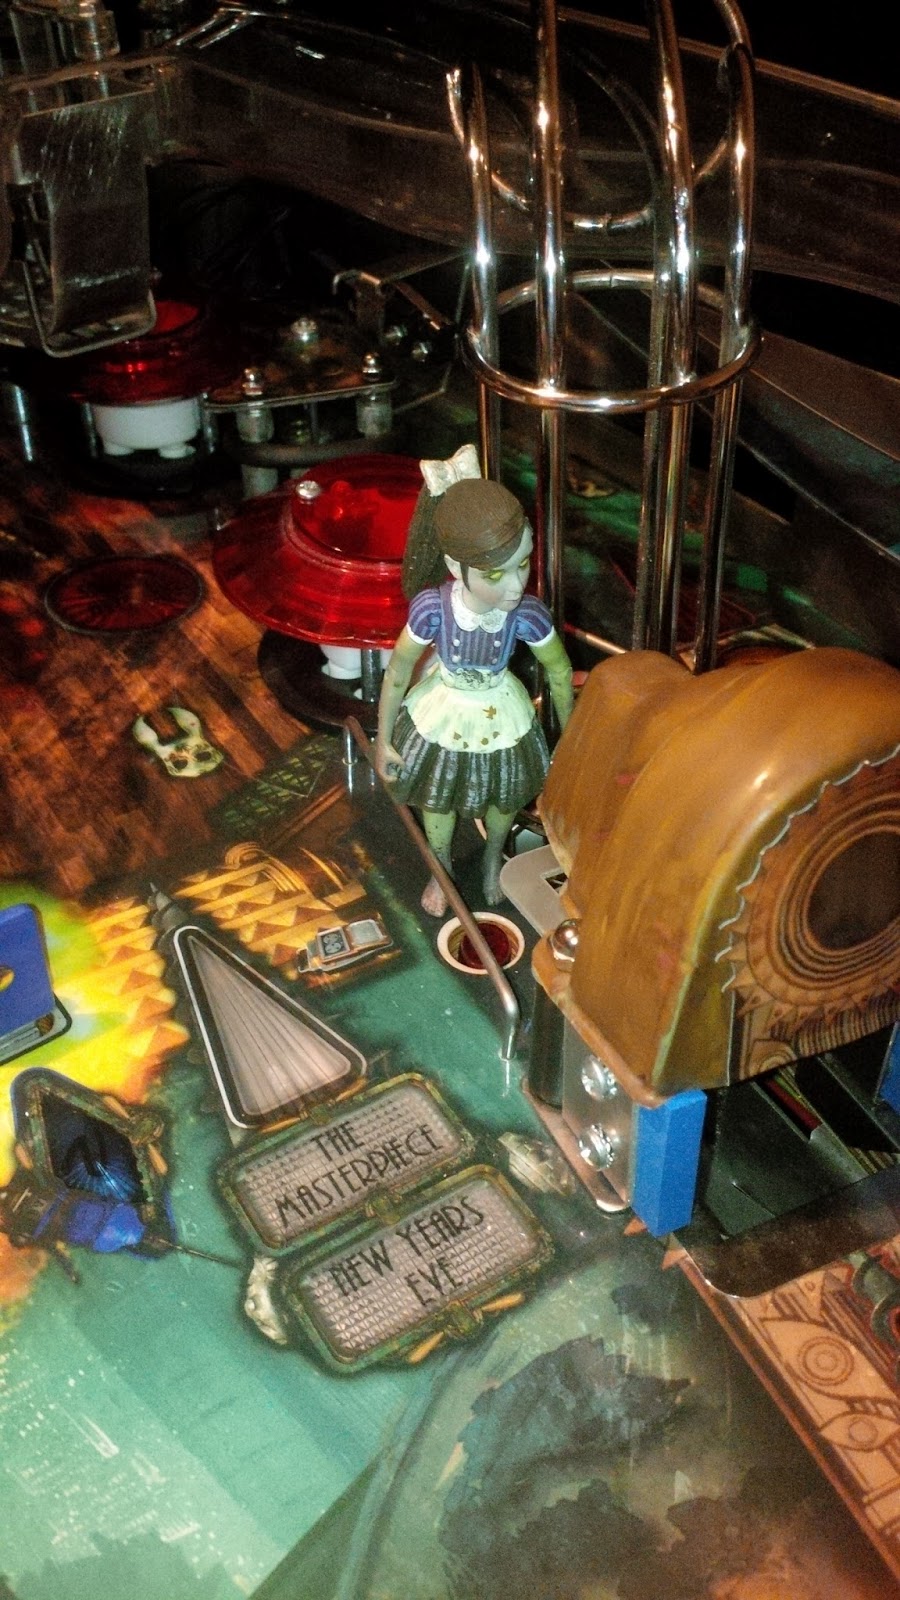
The "good" little sister has gotten her space at the end of the EVE-hypo, near the left outlane. That space needed a little decoration and this was spot on. The only downside would be the lack of proper lighting at that spot. I'll need to investigate this as soon as the lights are up and running, but worst case scenario is that I'll either cut holes in the playfield plastic for light to shine through or simply point a spotlight at her location.
 |
| 10) The "good" sister with the plastic bracket that holds her in place. |
The current state of the machine. Missing a few details in this picture, such as the little sisters, vent and the VUK, but as a whole it's really starting to take shape now.
 |
| 11) Near finished! Can't wait to put some coins in it! |
Friday, June 7, 2013
Wednesday, June 5, 2013
These boots were made for walking
Well, sort of.
Mr Bubbles has put his feet down and is properly anchored in the ground now.
Before he can swing about, I need to grind a little material of his arm since I managed to insert the servo slightly angled. It won't be visible and won't be a problem, but it's something that needs to be done. Then I need to solder his motor and fix the arm in a removable fashion.
A little tinkering here and there mostly, but still it's something.
It's a swedish holiday and I've got more or less nothing to do, so I'll try to get some soldering on the lights done tomorrow. Would be awesome to have it up and running before the weekend!
The current state of the upper playfield:
Looks more or less the same as before, but this time the parts are actually in place and not just laid out to get a nice picture. Shaping up!
Mr Bubbles has put his feet down and is properly anchored in the ground now.
 |
| 1) Mr B, King Bubbles, Big D... no, that's not it. I'm thinking about ditching the playfield plastic that will be/was going to cover the area around Mr Bubbles. I'm not sure thou, since there's no way for the ball to escape in case it volleys in there... Food for thought! |
Before he can swing about, I need to grind a little material of his arm since I managed to insert the servo slightly angled. It won't be visible and won't be a problem, but it's something that needs to be done. Then I need to solder his motor and fix the arm in a removable fashion.
A little tinkering here and there mostly, but still it's something.
It's a swedish holiday and I've got more or less nothing to do, so I'll try to get some soldering on the lights done tomorrow. Would be awesome to have it up and running before the weekend!
The current state of the upper playfield:
 |
| 2) The upper play area. The cables that are visible will obviously be hidden from view in the final version, but I haven't decided the best way to route them yet. I'm rather picky when it comes to the upper cable routing since I really hate visible cabling! |
Looks more or less the same as before, but this time the parts are actually in place and not just laid out to get a nice picture. Shaping up!
Sunday, June 2, 2013
Do not underestimate the power...
...of moving to a new apartment.
I've basically done nothing on the machine for the past month. :(
Too busy with other stuff (i.e life) and family, but hopefully I'll be back on track soon!
I've basically done nothing on the machine for the past month. :(
Too busy with other stuff (i.e life) and family, but hopefully I'll be back on track soon!
Subscribe to:
Posts (Atom)